


A winged foot may make a beautiful line in arabesque, but that winging action, called pronation, can actually cause a host of issues throughout a dancer’s entire body. When a dancer pronates, her foot rolls inward toward her big toe, dropping the arch of the foot. Movement analyst and alignment expert Deborah Vogel points out that, when standing correctly, the weight should be divided equally between three points of the foot: the pad of the big toe, the pad of the little toe and the heel.
“The most common problem that I see, especially in ballet, is that dancers turn out too much and start to roll in their feet,” says Vogel. “They’ll feel strain on the inside of their knees because they have to pull their knees out to get over their feet.” Another common result of pronating is that it makes it more difficult for the dancer to access her natural turnout correctly. “Pronation shifts your alignment all the way up to the pelvis,” says Vogel, noting that during pronation, everything starts to turn in. This makes it more difficult for the dancer to access her outward rotation from the hip joints.
By strengthening the intrinsic muscles of the foot and ankle, a dancer can help prevent or correct existing pronation. Having strong intrinsic foot muscles keeps the arches aligned, preventing them from dropping inward.
Here, Vogel shares three strengthening exercises to help correct and prevent pronation. She advises dancers to include these in their cross-training regimen.
First Wake Up Those Muscles
Take a Pinky ball and roll out the arches of your feet and the muscles of your calves. This will warm up your feet and work out any stiffness before the exercises. For each tender spot, hold for a few seconds until you feel a release.
Mobilize Your Ankles
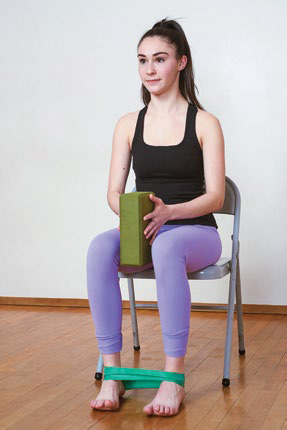
For this ankle mobilization exercise, having a TheraBand wrapped around your ankles puts pressure on your feet to pronate. By resisting that action and keeping your feet centered through the relevé, you’re essentially training the ankle where center is.
1. Sitting up straight in a chair, with your feet planted on the floor a few inches apart, tie a TheraBand in a loop around your ankles. You can place a yoga block vertically in between your knees to maintain space between your legs.
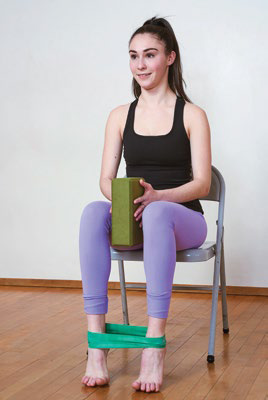
2. While seated, relevé for 2 slow counts. Hold for 4 counts, and then lower for 4 counts. Be sure to maintain the tension in the TheraBand around your ankles.
3. After lowering your heels, lift your toes off the floor.
4. Relevé again, keeping the toes lifted and maintaining a slight sickle in your feet. Up for 2, hold for 4, down for 4.
5. Repeat both versions of the relevé 5–10 times very slowly.
Strengthen Your Posterior Tibialis
The posterior tibialis, a muscle that runs along the back of the lower leg, helps to lift and hold the arch in the middle of the foot. When a dancer regularly pronates, it is underactive. “I would encourage dancers to notice when it is that they start to get fatigued and see if they can increase [the number of reps]”, says Vogel. “Many of them will get fatigued at a lower count.”
1. Seated in a chair, cross your right leg over your left, resting it on your thigh so that the area just above the ankle is making contact, and the foot and ankle are free to move.
2. Loop the end of a Theraband around the arch of your right foot, pulling the band down to hook under your left foot. Hold the end of the band with your right hand next to your hip. The band should make a V shape.
3. Slowly sickle and unsickle your right foot.
4. Do 3 sets of 10 repetitions.


Rise Up, Centered, and Strong
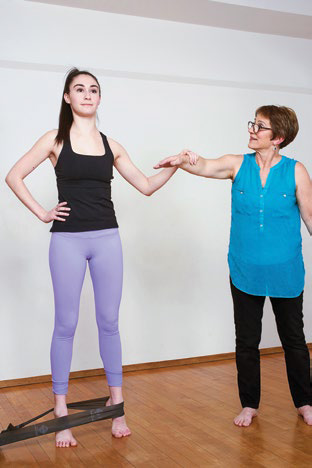
Vogel’s standing relevé exercise is a true test of strength. “It’s amazing how many dancers get tired before they’ve gotten to 15,” she says. “Especially when they do it on one foot.” The focus should be on rising up through the center of the ball of the foot. Be conscious of not supinating (distributing more weight to the pinky-toe side). “I don’t want them to over correct,” says Vogel.
1. Standing in parallel with your feet about hips’ width apart, wrap a Theraband around one ankle, pulling both ends past the opposite ankle to attach it to a sturdy fixture away from your body.
2. Slowly relevé actively resisting the Theraband’s pull toward a pronated position.
3. Slowly lower down, continuing to resist pronating. Work up to 3 sets of 10 repetitions.
Tip: Think of lifting the front and back of the pelvis up equally, so you don’t shift forward first over the ball of the foot,” says Vogel. “Think of going straight up and move the whole shape forward.”

Flat Feet vs. Pronation
Although at first glance they may look similar, flat feet are very different from pronated feet. A flat foot simply has a very low arch. “If you were stepping in sand, you’d see the majority of the foot outlined,” says Vogel. “But the weight would still be evenly distributed between the three points of the foot.” A pronated foot, however, is one in which the arch has dropped and the weight is more on the big toe side of the foot.